BrainBOK ITTO Explorer is even better now
 BrainBOK is that it’s developed from the perspective of a PMP aspirant. Many of the frustrations that I had as a PMP aspirant and as someone who still breathes the subject everyday, are being addressed with BrainBOK. The heart of BrainBOK is the ITTO Explorer. It all started with it and the rest just spawned from there.
ProblemPermalink
I refer the PMBOK Guide frequently for writing blog content and sometimes for job too, and really dread the sluggish and stuttering navigation through the big PDF file for finding simple things. To top that, the search functionality in the PDF is broken. Many a times you simply cannot find a term, which you know is there in the Guide and sitting right in front of your eyes. Moreover, I’m not a fan of the layout of the Guide. So, I had a need and I had to find a solution. ITTO Explorer is the solution.
I have been the biggest user of the tool and probably its biggest critic too. One of the limitations of the tool that had been bugging me was the inability to look up an Input, a Tool and Technique, or an Output (ITTO), and know its “used by” processes. Let me take an example and describe the problem first. Let’s say I want to know the processes where “Alternatives Identification” is a Technique. If I had no idea which process it belonged to, I would have to randomly click on several of the 42 processes in the Process grid (top section), and find a process where “Alternatives” Identification is a Tool and Technique. Depending upon my luck and familiarity with the subject, it may take many mouse clicks and several wasted minutes to get to that Technique. Of course, once I hunt down the technique, it’s easy - I can simply click on the Technique in the “Tools and Techniques” grid to see its “used by” processes in the bottom section. But, getting to the Technique in the first place was the problem.
In my view, the method described above wasn’t the best way of exploring ITTOs and was a serious limitation of the tool. There had to be a way to simply go to an alphabetically sorted list of ITTOs, pick the ITTO that I was interested in and know its “used by” processes. I came up with several designs to solve the problem, but all of them involved developing a new screen and laying out a different set of grids on the new screen. It was going to be more work for me and probably wasn’t going to be as user friendly as I wanted it to be. I really wanted a way to meet my requirement using a single screen and without making much changes to the layout.
SolutionPermalink
Finally, after hours of brainstorming (between my left brain and right brain), I think I have a good solution. The solution involves just one extra button at the top of the screen to Load / Reset data and absolutely no other changes to the layout. The button also is somewhat optional, but I included it for other good reasons explained below.
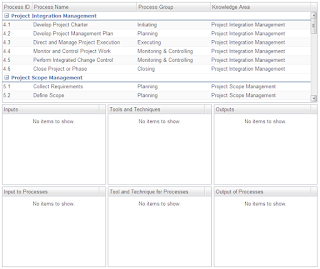
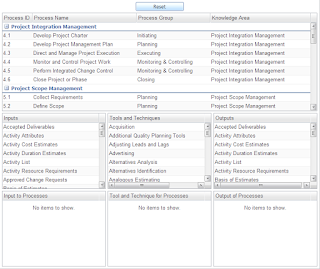
When the ITTO Explorer screen is displayed, I have to click on the “Load Data” button to populate the grids. This load could have been automatic, but I deliberately made it manual in order to reduce the initial load time for people who are not particularly interested in the ITTO Explorer, but instead want to use other tools (like Exam Simulator and Flashcards). When the data is loaded, previously only the Process grid (top section) was loaded. The grids in the middle and bottom sections were empty. But now, the ITTO grids (in the middle section) are also populated, with the list of alphabetically sorted ITTOs. Now if I want to know where “Alternatives Identification” is used, I can go straight to the “Tool and Technique” grid in the middle section, click on that Technique in the list and get the information I want. Of course, if I don’t even know whether “Alternatives Identification” is an Input, a Tool and Technique, or an Output, then I may have to look up for that name in all three grids in the middle section. The “Load Data” button changes to “Reset” after the initial load. Without this button, you’ll have to reload the entire application to get back to the complete list of ITTOs again. This is the main reason for including that extra button. Refer to the “Before” and “After” screenshots:
This enhancement was rolled out yesterday. I hope you’ll find it useful. I’m open to all constructive feedback - ideas, comments, suggestions, criticisms - to make this tool better.
Image credit: Flickr / schanlaub


4 Comments
Hassan
Anonymous
Anonymous
Harwinder Singh